

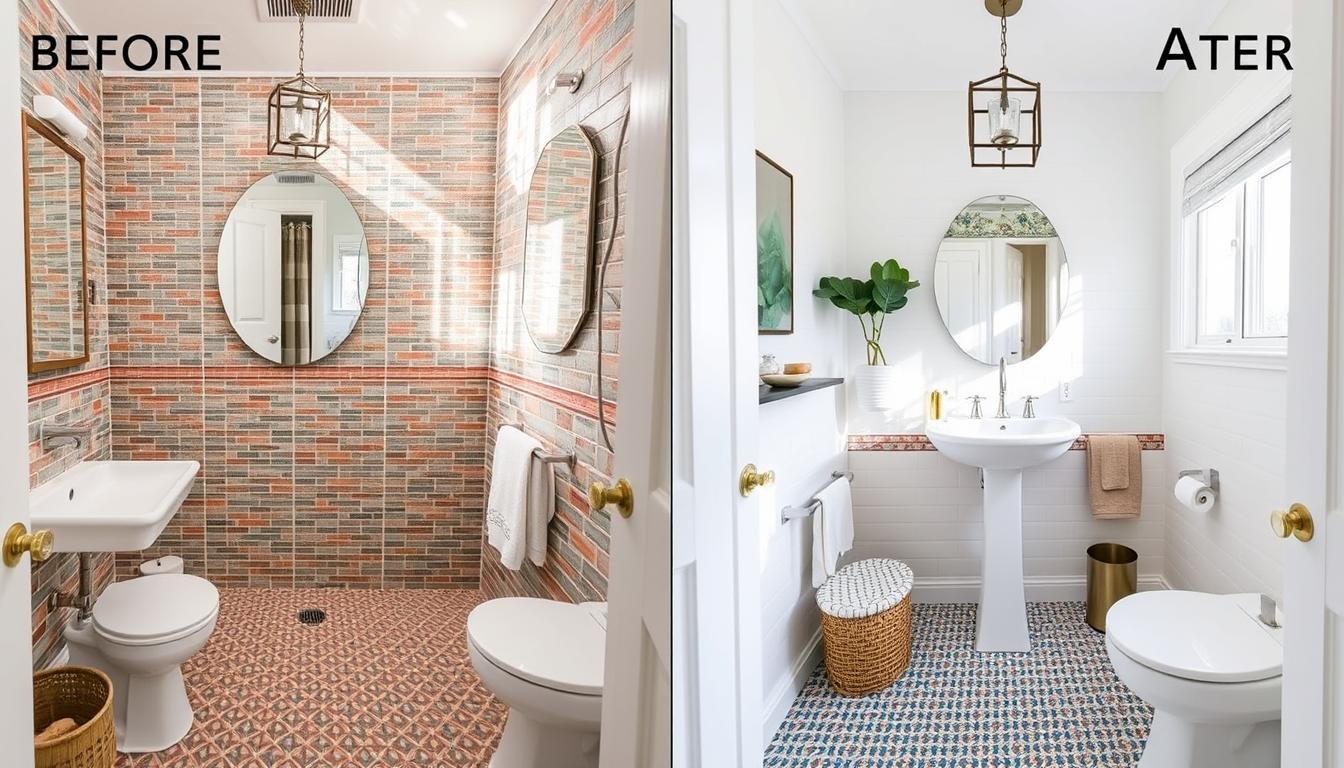
Ever thought of updating your bathroom without tearing out tiles? Many think a new bathroom means removing old tiles. But, there are smart ways to refresh your bathroom without this hassle.
We’ll look at ways to renovate your bathroom without removing tiles. You’ll learn about waterproof panels, tile stickers, and more. These options save time and effort, letting you achieve a modern look easily.
Key Takeaways
- Transforming a bathroom without removing tiles is possible and practical.
- Waterproof wall panels provide a quick and grout-free solution.
- Tile stickers or decals can refresh your space with minimal effort.
- Updating fixtures like faucets and cabinet hardware adds a touch of modernity.
- Grout renewal and deep cleaning are essential for maintaining tile aesthetics.
Understanding the Need for a Bathroom Update
Bathroom updates are key to keeping your home looking good and working well. As styles change, it’s clear that a bathroom makeover is needed. Homeowners might want to update for better looks, function, or to increase their home’s value.
Old fixtures and outdated tiles can make your bathroom look bad. Over time, wear and tear can also be a big reason for a renovation. You might want a bathroom that’s easier to use or has energy-saving features.
Choosing to update without removing tiles can make a big difference quickly. A thoughtful makeover can make your bathroom look and feel better. It keeps your space welcoming and useful.
Benefits of Redoing a Bathroom Without Removing Tiles
Renovating your bathroom without removing tiles has many benefits. One big advantage is saving a lot of time. Removing tiles can take a long time, making projects drag on. With smart makeover strategies, you can finish your bathroom update much quicker.
Another key benefit is saving money. Updating without removing tiles can cut costs by up to $5,000. This is because you avoid the expense of new tiles, demolition, and installation. It makes your renovation cheaper without sacrificing style.
There’s also less chance of damaging your bathroom’s structure. Removing tiles can harm walls and plumbing, adding extra costs. Keeping your tiles means less risk of damage. Plus, it means less mess during the renovation, making it more comfortable.
Lastly, this approach is better for the environment. It keeps old tiles out of landfills, helping to reduce waste. Whether you paint, use stickers, or refinish, it’s a green choice for your home.

| Benefits | Details |
|---|---|
| Time Savings | Renovation can be completed faster compared to traditional methods. |
| Cost Efficiency | Save up to $5,000 by avoiding labor and new tile costs. |
| Reduced Risk of Damage | Minimized risk to walls and plumbing compared to tile removal. |
| Less Mess | A cleaner renovation process with minimal debris. |
| Eco-Friendly | Avoids adding waste to landfills by preserving existing tiles. |
How to redo a bathroom without removing tiles?
There are many ways to update your bathroom without removing tiles. You can use tile stickers or decals for a quick change. These are water-resistant and come in many designs.
Refreshing the grout is another good idea. Grout pens can change the look of your bathroom. You can also lay new tiles over the old ones for a more lasting fix.
Microcement is a modern choice that’s durable and easy to clean. It can be applied quickly over old tiles. It comes in many colors, making it easy to match your style.
Changing fixtures like faucets or mirrors can also make a big difference. Simple changes like a new shower curtain or rug can brighten up your bathroom. Adding plants and accessories can also modernize your space.
Here’s a table that shows different ways to update your bathroom:
| Method | Description | Benefits |
|---|---|---|
| Tile Stickers/Decals | Water-resistant and designed to fit existing tiles. | Effortless transformation and customizable designs. |
| Grout Renewal | Coloring with grout pens. | Significantly improves appearance without major work. |
| Overlaying Tiles | Applying new tiles over the existing surface. | Permanent solution with minimal disruption. |
| Microcement | Seamless application over old tiles. | Durable, low maintenance, and stylish finish. |
| Fixture Upgrades | Changing faucets and mirrors. | Adds elegance with modern designs. |
| Accessory Updates | Using rugs, curtains, and plants. | Quick updates to refresh the overall look. |
Painting as a Cost-Effective Solution
Updating your bathroom can make it look new without a full renovation. Painting tiles is a budget-friendly way to get a fresh look. It’s important to pick the right paint that’s moisture-resistant and durable for a lasting finish.
Choosing the Right Paint
For painting tiles, use high-quality paint made for tile surfaces. Choose paint that’s good against moisture since bathrooms are humid. Some top picks include:
- Rust-Oleum Tub and Tile Paint
- Behr Premium Porch and Patio Floor Paint
- KILZ Interior/Exterior Porch and Patio Latex Floor Paint
Measure your tiles to figure out how much paint you need. Rust-Oleum Tub and Tile Paint covers about 110 square feet. This makes updating your bathroom affordable.
Steps for Painting Tiles
To paint your tiles, follow these steps:
- Clean the Tiles: Get rid of soap, dirt, and oils for better paint adhesion.
- Apply Primer: Use a tile primer to help the paint stick better.
- Paint the Tiles: Put on the first coat of paint, let it dry, then add a second coat if needed.
- Full Cure: Let the painted tiles cure for up to 7 days.
This method can save you a lot of money, making a bathroom makeover under $1000 possible. Many people are still happy with their painted tiles years later. It shows that a smart choice can last a long time.
Using Waterproof Wall Panels
Waterproof wall panels are a modern way to update your bathroom. They come in materials like PVC and make your space look better. They also make updating your bathroom walls easier and cheaper.
Types of Waterproof Wall Panels
When picking waterproof wall panels, think about style and function. Here are some top picks:
- PVC Panels: These are affordable and easy to care for. They’re great for covering old tiles.
- Acrylic Panels: They’re tough and fight mold well. Perfect for wet places.
- Wood-like Designs: For a rustic look, these panels mimic wood. They’re also moisture-resistant.
Each type meets different design and practical needs. So, you can find the ideal match for your space.
Installation Process
Installing waterproof wall panels is easy and can be done in a day. Here’s how to do it right:
- Clean the surface before starting.
- Measure and cut the panels to fit, using their flexible sizes.
- Use the Hydrolock® system for smooth connections. It hides wall flaws.
- Attach the panels to the wall with the right adhesives or fasteners.
- Check everything is in place and secure.
After installation, upkeep is minimal. No grout means less mold risk and easy cleaning. These panels add beauty to wet areas like showers and refresh your bathroom’s look.

Incorporating Tile Stickers or Decals
Updating tiles with decals is a creative and affordable way to refresh your bathroom. Tile stickers and bathroom tile decals are easy to apply. They let you change your tiles’ look without the mess and cost of big renovations. Plus, they come in many stylish designs to fit any style.
Advantages of Tile Stickers
Tile stickers offer many benefits for those wanting to improve their bathrooms:
- Easy Application: They are simple to apply with a peel-and-stick design.
- Water-Resistant: They are made for places with lots of moisture and water.
- Variety of Designs: You can find many colors and patterns to match or contrast your decor.
- Temporary Solution: They are easy to remove, so you can change them often without big hassle.
- Enhances Aesthetics: The right tile stickers can make your bathroom look modern and new.
Application Tips
To get the best results when putting on tile stickers:
- Clean the Surface: Make sure the tiles are clean and dry for the best stick.
- Measure Carefully: Measure your tiles to pick the right size stickers.
- Choose Designs Wisely: Pick decals that go well with your colors and furniture.
- Follow Instructions: Follow the maker’s directions for the best way to put them on and take them off.
- Consider Lighting: Make sure the bathroom lighting makes your new tiles look good for a finished look.
Using removable vinyl tile stickers is a smart choice. It lets you update your bathroom easily without making a big change. It’s perfect for those who like to change things up often.

Exploring Tile Refinishing Options
Tile refinishing is a great way to make your bathroom look new again without tearing out the old tiles. It gives your bathroom a fresh feel and makes your surfaces last longer. Many homeowners choose this option because it’s durable and saves money.
Pros of Tile Refinishing
Tile refinishing has many benefits:
- Cost-effective: It’s often cheaper than replacing all the tiles, saving you money.
- Quick turnaround: You can get your tiles looking new in just a few hours, with little disruption.
- Customizable finishes: You can pick from many colors and textures to fit your style.
- Improved durability: Refinished tiles not only look new but also last longer and resist stains better.
Finding a Professional Service
Getting a professional to do the refinishing is key for a good job. Here’s how to find the right service:
- Check for certifications: Look for experts with the right experience and certifications.
- Read reviews: Check online reviews to see if the service is reliable and good quality.
- Request quotes: Get quotes from different services to find the best deal.
- Ask about their processes: A good service will explain their steps, like sanding and polishing.

Exploring tile refinishing options can make your bathroom look new again without breaking the bank.
Overlaying with New Tiles
Overlaying tiles is a smart way to update your bathroom or kitchen. It lets you put new tiles over the old ones, saving time and money. But, you need to know what to do first and choose the right adhesive.
Requirements for Overlaying
Before you start, check the surface of your old tiles. Look for any loose or damaged areas. Make sure no more than 5% of the tiles are hollow when you tap them. Clean the tiles well to help the new ones stick better.
Choosing the Right Adhesive
Picking the right adhesive is key for a good overlay. Look for adhesives made for this purpose. They bond better. Here are some things to think about:
- Weight Limits: Make sure the adhesive can hold the weight of the new tiles, especially if they’re on plasterboard.
- Moisture Resistance: Choose adhesives that can handle moisture to avoid damage over time.
- Floor Surface Conditions: Check the floor’s condition, including any mildew or uneven tiles, before picking an adhesive.
After preparing the surface and picking the right adhesive, you can start laying the new tiles. Place each tile carefully, making sure they line up with the old ones. Then, apply grout between the tiles to keep them dry and make them last longer.
| Consideration | Details |
|---|---|
| Inspection | Ensure no more than 5% of tiles are loose or damaged. |
| Surface Preparation | Clean thoroughly to remove dirt and mildew. |
| Adhesive Selection | Choose moisture-resistant, strong bonding adhesives. |
| Grouting | Apply grout to protect against moisture and enhance durability. |
Refreshing Grout for a New Look
Improving your bathroom’s look often depends on the grout. Over time, grout can get dirty, crack, or grow mold. Luckily, you can make your tiles look new again. There are many grout cleaning products to help you do this without spending a lot.
Changing the color of your grout yourself can also be a smart move. It’s a way to cover up any flaws without breaking the bank.
Grout Renewal Products
Before you start, make sure to clean the grout well. Use vinegar or special cleaners to get it ready. Then, pick the right product for your needs:
- Sanded Grout – Great for bigger gaps, over 0.3cm.
- Unsanded Grout – Perfect for small spaces, especially with marble.
- Epoxy Grout – Durable, good for kitchens, but needs a pro to install.
Mix the grout right away, as it gets thicker fast. Wait 24 to 48 hours before using the bathroom again. Applying a sealer later helps keep it looking good longer.
DIY Grout Coloring Tips
If your grout looks old, you can change its color yourself. Here’s how to do it right:
- Choose a grout pen or epoxy for color changes.
- Apply the new color carefully to cover evenly and fill cracks.
- Think about sealing your grout again to protect it from water and germs.
Renewing or coloring your grout can make a big difference. With a little care, your bathroom will look cleaner and more inviting.
Upgrading Fixtures and Hardware
Upgrading your bathroom’s fixtures and hardware can make a big difference. It gives your bathroom a fresh look without tearing out the tiles. This change not only makes your bathroom look better but also makes it more functional.
Faucets and Showerheads Update
Updating your faucets and showerheads is a great way to modernize your bathroom. Look for materials like matte black or brushed nickel for a stylish contrast. Adding a sleek handheld sprayer or a luxurious rainfall showerhead can greatly improve both style and convenience.
Choosing Stylish Cabinet Hardware
Your cabinet hardware is key to your bathroom’s design. Choose modern brass knobs or unique vintage pulls to add character. These elements help create a cohesive look that enhances your bathroom without the need for big changes or tile removal.